
Q is for Quilt
I have a lot of favorites among our quiet book pages, but this is definitely one of the top. When I first outlined the alphabet quiet book and our preschool goals for the year, I knew Q would be for quilt, and that we would be learning how to make a bed that week. But when it came to designing the quiet book page, I didn't find any examples that really taught about how to make a bed, so I ended up designing my own. I love the result!

Inspiration and Page Design
I originally started thinking about doing a quilt for the Q page when I saw the cute alphabet quiet book Dacia made on Fluffy Bunny Feet Designs. She used the quilt as a pocket for hiding treats or notes, which is a great idea, but didn't really fit in with my goal of learning how to make a bed. After I finished my quilt page, I also ran across the idea of making an I-Spy quilt using squares with pictures from novelty fabrics. My favorite one of these is on Empty Bobbin Sewing Studios, which features some really beautiful fabrics. But like I said, I ran across that idea after I finished my Q page, and my main goal was designing a bed-making page anyway.

I considered making a mini quilt with a fancy pattern and triangles and everything, but in the end I decided on a simple square patchwork design like this one from Mama Loves Quilts.
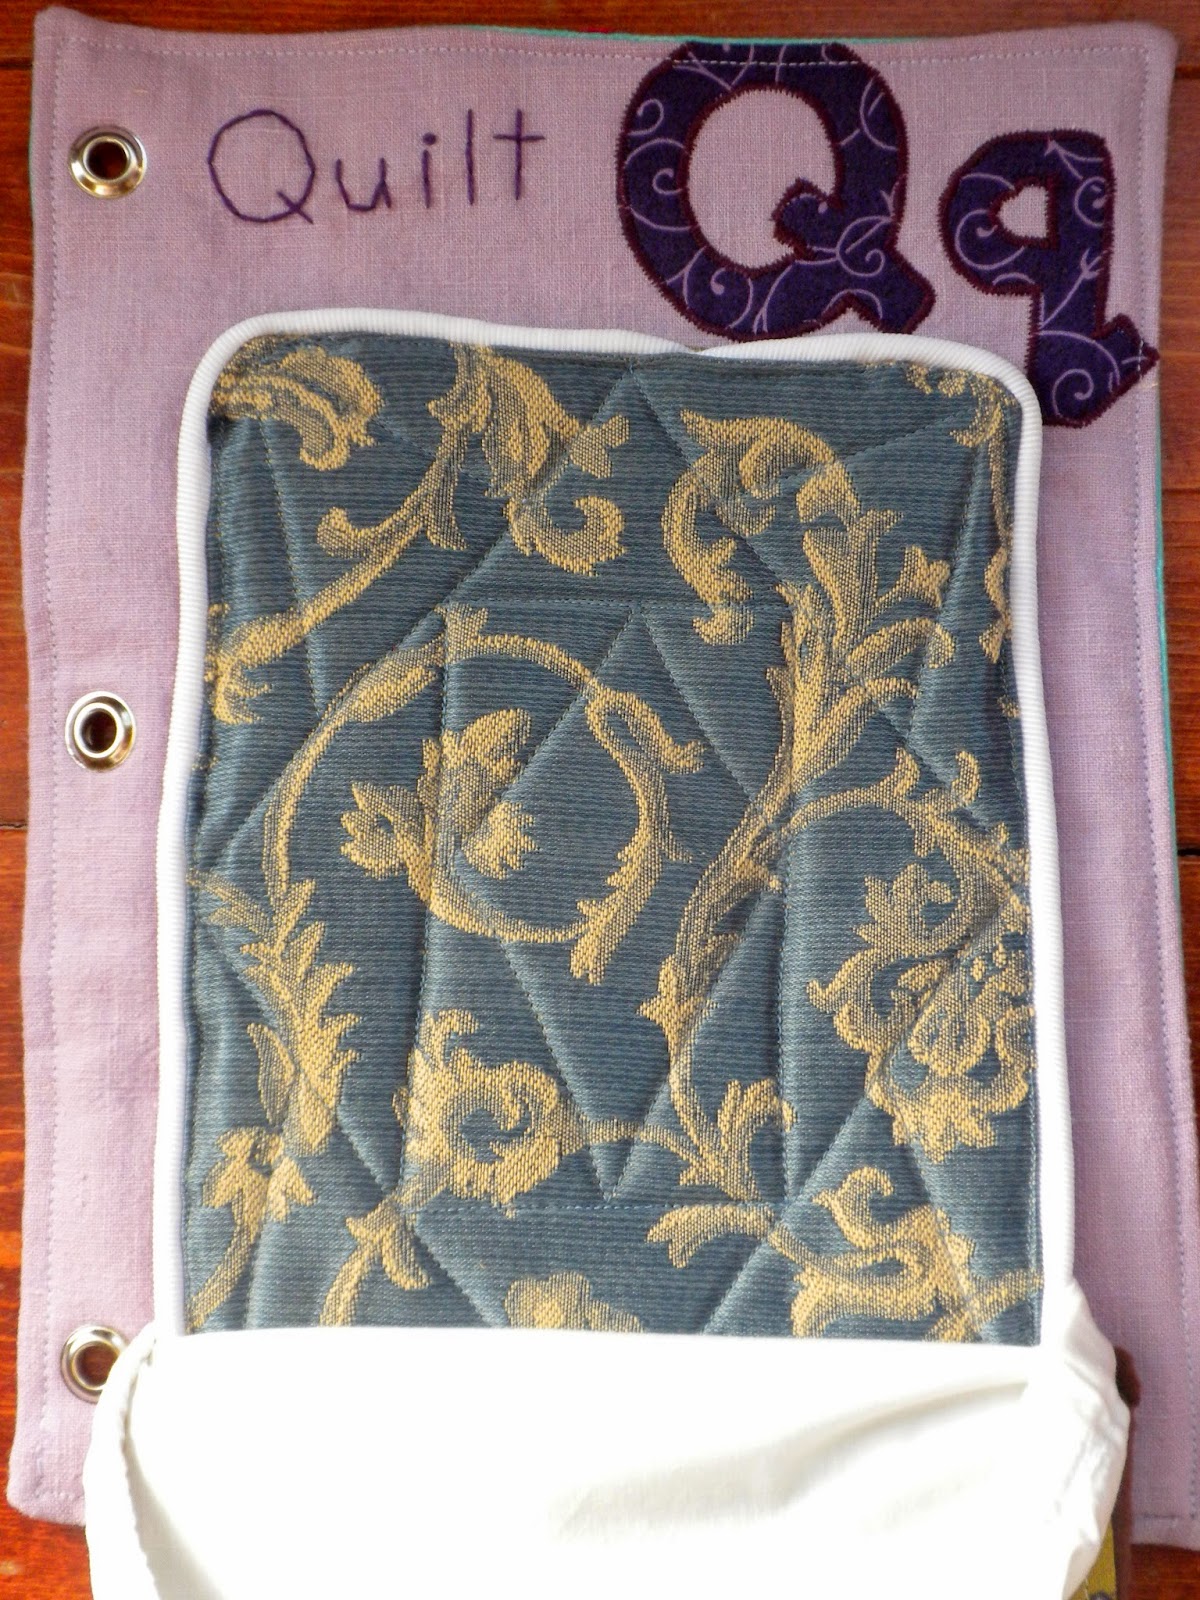
To make a 6" square patchwork quilt of 1/2" squares I had to cut 100 1" squares. Look at how much that shrinks once you sew 1/4" seams around them all! Once I'd pieced the center squares all together, I added a 1/2" border around. Then I sewed the backing and quilt top wrong sides together, flipping it right side out and ironing open just like I do with all of the quiet book pages, ending with machine quilting. I skipped using any batting, since it was bulky enough with all those seams inside.

Under the quilt I have a brown fleece blanket. This is just a square of polar fleece that I hemmed up, adding some pretty stitches with my machine to give it a finished look. After I had all the bed linens assembled and in place, I folded the bottom edge of the blanket around the sheets and mattress, and stitched carefully through all the layers to hold them in place. Thus, the sheets and blanket are attached to the mattress at the bottom edge, but not to the page itself. The quilt I hand-stitched to the bottom edge of the blanket so that it wouldn't have to fold much, to cut down on bulk and avoid hiding any of the square quilt under the bed.

The green flat sheet is much the same as the blanket, except I made it a bit longer so it could peek out from under the quilt and tuck neatly under the sisters' chins.

The sister finger puppets all rest on top of the fitted sheet which was sewn, appropriately enough, from an old white sheet I've been cutting into for a long time.

The little pillow cases, made in green to match the flat sheet, are all hand stitched to the fitted sheet, so they won't fall off the page. The tiny white pillows, each stuffed with a cotton ball, are removable but fit snugly in the pillowcases.

This is a close-up look at how the fitted sheet fits all around the mattress, which is attached to the page in the middle.

After making it through all those layers, we finally reached the mattress. I know it's kind of silly, but this is the part I'm proudest of on this page. It looks so much like a real mattress! I had some upholstery fabric for a couch I'm re-covering for our living room that is perfect mattress fabric, so I used a square of that for my mattress. I made some piping with a white shoelace and grosgrain ribbon, and sewed that in as if it were a flat pillow. Between the two layers of upholstery fabric I sewed a rectangle of a felted wool sweater for heavy batting. It gave the mattress the perfect amount of substance. Finally, I machine-quilted the whole thing so it had the texture and stability of a mattress.
Another thing I had to reconcile was the need to have the mattress to stay in place on the page, but also allow the edges to be free so the fitted sheet could be tucked in around. Now that I've done it, the answer seems obvious - sew the center of the mattress to the page - but it took me a long time thinking about it to reach that answer! I stitched right over the inner rectangle of quilting lines, and it works perfectly.

Annie, Jenny, and Laurel, Matryoshka style
My mom made these adorable wool felt finger puppets for the girls' stockings this Christmas, and I knew right away that they'd find a home in our alphabet quiet book. I think they're made from this pattern on The Prudent Homemaker. They really are the icing on the cake of the quilt page - without them, the quilt page would be a little dry and flavorless! Annie and Laurel have the brown hair, and redheaded Jenny has the goldish orange hair. I tried to tuck the in bed in age order, but Annie and Laurel were adamant that Jenny needs to go in the middle. I'm not sure if that's because they really like their little sister or if they're just OCD about symmetry.
Now that we've looked at all the layers, let's make the bed and tuck the sisters in!

Preschool goals for using the Quilt page
My goals for this page are to teach the girls about the necessary components of a properly made bed (fitted sheet, flat sheet, blanket (give or take depending on the weather), quilt, pillows, and pillowcases. I wanted them to learn the order they go on, and to start to get the hang of tucking and smoothing them out over the bed. In real life, I'm also trying to teach them to make their own beds. It's a work in progress, but they do seem to be getting the idea, and they are already experts at making the bed on the Q is for Quilt page.

Again, this is amazing! I'm blown away by your creativity! That mattress look SO real. What a wonderful page.
ReplyDelete