Wednesday, November 27, 2013

Wednesday Wash Day


Hey ya'll! It's Wednesday! And here at our house, Wednesday is Wash Day. (OK, not this week. This week Tuesday was Wash Day, since we're heading down to visit Gramps and Nonnie for Thanksgiving. But only a holiday as big as Thanksgiving can break our hard-and-fast rule about Wednesday being Wash Day. These pictures are actually from last week.)

With this year being Collin's first year teaching at his new job, along with moving and starting preschool, I needed to institute a lot more structure and routine into our lives to keep everything running smoothly. Wednesday Wash Day has been a huge help in that regard.

When it comes to laundry routines, most people divide along the lines of the "one or two loads every day" group, and the "set aside a laundry day" camp. I've always been more of a laundry day sort of person, and now that we live in a house where the washer and dryer are in the kitchen, it works so much better to have one day to move all the laundry through and out again. Wednesday just works best because it's the middle of the week, ensuring that we'll still have plenty of clean clothes for the weekend, and because we generally don't have guests over on Wednesday.


First thing on Wednesday morning, I start a load of whatever laundry is nearest the washing machine, which usually is a lot of kitchen towels. It takes almost an hour to get each load of wash through, so the sooner I can get it started, the sooner I can get it all done. Then I clean off the kitchen island so I can fold, sort, and stack each load of laundry as it comes out.


After the first load of laundry is in the washer, I gather all the laundry from upstairs. This includes stripping the sheets from our beds. This week is a little bigger than normal, because we had guests on the weekend so there are two extra sets of sheets. 


I dump out all the laundry in front of the washing machine, and then sort it into piles by color. This week there are eight loads of laundry, which is only one load more than our cold-weather average of seven loads.


The whole family gets washed on wash day too! Wednesday isn't the only day the girls get baths, but they get an extra long bath on Wednesday morning. After they get dressed, we have a fun after-bath tradition - either applying temporary tattoos, or painting our toenails. Today the girls asked for tattoos, and enjoyed sorting through all the options.


Annie picked out a sunshine, and Laurel a flower. How appropriate!


Jenny was not as into showing off her "COOL" tattoo. After moving the laundry along, it was time to take a break and put the baby to bed.


When I brought Annie's sheets up from the dryer, I found the girls playing in a mountain of blankets. Time to get off the bed and make it, girls!


That's better. There are few things cozier than a neatly made bed with clean sheets. It's even nicer when that bed is in a sunny bow window like this one. I sure love the girls' room, especially in the winter when the low sun makes such big sunny patches!


Laurel's bed is also cozy and ready for nap time. Which is good, because it's about that time already! Nap time means I can also participate in Wash Day be getting a shower myself. At this point in my life, showering is truly the most difficult thing to work into my day. Craft projects I can drop if I have to run to pick up a crying baby or a toddler with a sudden gushing nosebleed, but it's harder and less pleasant to run out of the shower, half-washed and covered in soap suds.


Back to the laundry part of Wash Day. As each load of laundry comes out of the dryer, I fold it as soon as I can to keep the ironing to a minimum. Collin likes to hang up all his clothes in the closet, including t-shirts. Because his closet rods are high up, and because he's nice that way, I just smooth the wrinkles out and stack them on my kitchen step ladder for him to hang up later.


Just before we're ready to eat dinner, I finish folding the last load of laundry. Often on Wash Day we eat a meal from the freezer to simplify life. This night we had soup and cornbread, which was fast to heat up and comforting to eat. All the clothes are folded and sorted into piles, according to what room and drawer they go in. It only takes about 15 minutes to put away all these clothes when they're sorted and stacked this way.

And with that, we've conquered another Wednesday Wash Day! It's always a good feeling to see the empty counter top and the nearly-empty laundry baskets at the end of the day. That feeling of accomplishment might be one of my favorite parts of doing all the week's laundry in one day - for a brief moment that one chore is finished, and won't need to be tackled again for another week.
Tuesday, November 26, 2013

Alphabet Quiet Book: C is for Clock

This post is the fourth part in a series about the alphabet quiet book I'm making with the girls for preschool this year. To read the introduction, click here, and to read the rest of the posts (updated on a weekly basis) click the "Quiet Book" label on the right.


C is for Clock
Teaching Annie to tell time has been a recurring theme all year. Until fairly recently Annie and Laurel were both taking afternoon naps, so I gave Annie a digital clock and taught her she wasn't allowed to make any noise that could wake her sister up until 4:00. The girls also have a sunshine clock-faced clock in their room that Annie has been puzzling over for a while, learning the positions of the numbers but having difficulty knowing how to tell the time. And then, when we moved this summer, we discovered with delight that our new house is only a block from a beautiful old church that chimes every hour and half-hour, so we are ever more aware of the passing of the hours. All that to say, I knew that I wanted the C page of our quiet book to have clocks so that Annie can practice learning to tell time.


Inspiration and Page Design
Lots of quiet books have clock pages, but I drew most of my inspiration from this one. I loved how it combined the old-fashioned alarm clock shape with digits, so you can practice translating the analog time to digital. When I wrote down the numerals that would be necessary to make most times, however, the number of loose pieces became staggering. Many numbers would need to have duplicates, or even triplicates. Finally, I came across this clock page with a somewhat better solution to the problem. Instead of having all separate numbers, it combines the most common 2-digit combinations: 10, 11, 12 for the hours, and 00, 15, 30, and 45 for the minutes. I still would have 17 loose pieces to the page, but it was at least a slightly more manageable number.


Before we get to the digital clock, first let's look at the analog clock. I made the clock face with shrink film, so it's a nice thick disc of plastic. As the instructions on the package suggest, I lightly sanded the back of the plastic in a cross-hatch pattern with 400-grit sandpaper, and then colored on it with colored pencils. Since I was coloring the back, I drew all the numbers on in reverse. I used a regular hole punch to punch the sewing holes around the edge before shrinking, and they were perfectly sized button holes after. Shrink plastic shrinks somewhat unreliably, so this was an 8.5" (full width of the page) perfect circle before shrinking. After shrinking, the disc was slightly shorter than it was wide, so I made a second version to see if I could get a better result. The second attempt was even more wonky than the first, so I just went with it. The final size of the plastic disc is just over 3" across. The clock hands are also made with shrink plastic, colored on the back with sharpie. Altogether, the shrink plastic makes a very satisfying clock face - sturdy, and easy for little fingers to manipulate.


I designed the digital clock to be a slightly whimsical version of the old-school clock radio in the girls' room. The colon separating the hours from the minutes is part of the sewn-down clock (made with French knots), and under the numbers are Velcro "hook" patches to hold the felt numbers. Each separate felt digit also has Velcro "loop" patches. Although the felt itself would stick to the plastic "hook" patches, I wanted to protect the felt from so much wear and tear. The sewn-on hook and loop strips work very well for keeping the pieces secure.


Here they are - all seventeen digits! As you can see, I failed miserably in my goal of trying to minimize pages with loose parts when it came to the C page. I think it's worth it, still, since time-telling is a key life skill that I think this page will help teach very effectively.


When they're not in use, all the pieces stack neatly and fit into this fabric envelope. I used the tutorial on this page to make my envelope, although it was very simple. Basically you make a double-sided rectangle with a point, tri-fold, and sew in place. The loop is made with one of the girls' hair elastics!


Preschool goals for using the clocks
My goal for this page set is very straightforward: Learn how to tell time, both on analog and digital clocks, and be able to translate the time back and forth. Because of the number of pieces, this is one page the girls aren't allowed to play with unsupervised. The grommets and rings make it easy to take this page out if I want to let the girls play with the other pages by themselves, and playing together is a key part of preschool so I don't mind saving this page to use together!


Other Letter C activities
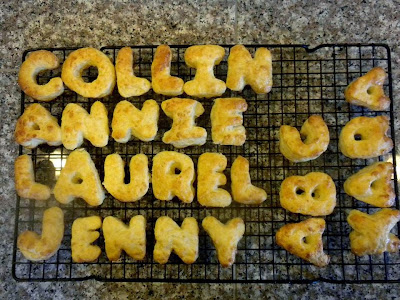
Besides clocks, C week was all about cookies and cookie cutters! We gave Annie a set of 101 cookie cutters for her birthday, and on C week we made ABC biscuits, ABC "breakfast cookies" for Daddy's students (I'm not going to link to a recipe, they were rather underwhelming), and ABC cookies for us. Any time I can include cooking with our preschool lessons I try to do so, because it's fun, makes the lessons more memorable, and adds another dimension to whatever we're studying. The alphabet cookie cutters are great for preschool, because you get to spend time learning the letters both when cutting out the dough and when eating the snacks, and the 3-D shapes give plenty of tactile experience learning the form of each letter.


Speaking of learning the shapes of letters, this song has been hugely helpful with that as well. Annie is constantly biting round food into the shape of the letter C just like Cookie Monster. And when Laurel and Annie growl together, "May we have a cookie, cookie, cookie?" it's just too hilarious and cute to say no.

Wednesday, November 20, 2013

Alphabet Quiet Book: B is for Bumble Bee

This post is the third part in a series about the alphabet quiet book I'm making with the girls for preschool this year. To read the introduction, click here, and to read the rest of the posts (updated on a weekly basis) click the "Quiet Book" label on the right.


B is for Bumble Bee
Many of my quiet book pages are inspired by other examples I've found on the Web, but this one is directly from a tutorial and template by Stephanie at Imagine Our Life. She does some of the most beautiful quiet book pages I've seen, although also many of the most labor-intensive ones. Although most of the design process was taken care of by using the pattern, there was so much hand stitching that this page actually took me almost two weeks to finish. I love that the sequential lacing activity is different from many of the traditional quiet book pages, and that it doesn't have any loose parts. That alone makes the large amount of stitching worth it!


My modifications to the original design
My pages are smaller than the ones on the original design (8" by 10.5" instead of 9" by 12"), and I also had to fit in the letters B and b, so it took a bit of juggling to get everything to squeeze nicely. I used a fat quarter of teal fabric for the page  backing, since all my pages are made of woven fabric rather than felt. For the flowers I used various colors from a felt starter pack I found at Walmart for $2.50 - by far the cheapest way for getting a beginning palette of felt pieces that I found. The green for the leaves is cut from a felted wool sweater that I had in my stash, since I liked the thicker texture for the leaves and wanted a better contrasting green than the one available in the felt pack from Walmart.

Although I hand stitched the flowers, leaves, and rings together and hand embroidered all the numbers, I machine appliqued the large leaves, hive, and letters. The rings are large aluminum jump rings, which I had leftover from another project a long time ago and were just large enough to fit a pony bead bumble bee through. I couldn't find any pretty light green cord like in the example for the lacing cord, so I used a long black boot lace instead. It was just barely long enough to make it through all ten flowers and into the hive.

Two Page Spreads
A number of my alphabet pages are spread across two pages, but a few of them really need need to be joined at the middle rather than having a two-inch gap. This page is the first of my connected two-page spreads, and I made them essentially like the cover. The inside spread is assembled as one big piece, and then the back pages (in this case, Letter A and Letter C) are sewn together, with page 4 (C) on the left, and page 1 (A) on the right. Then I sandwiched the whole thing together just like I would a smaller page, sewed around three sides, flipped it right side out, pressed, and top stitched 1/4" around the outside. The only differences between this and the smaller pages is that I also sewed a line straight down the middle to help the page fold in half, and I applied two rows of grommets down the middle of the page to allow the rings to go through. 

In general, I like the single pages better since they turn more easily, are less bulky, and are easier to add and remove from the book. Because of this, unless a double-page letter significantly benefits from being joined at the middle, I'll keep them as separate pages. Still, it's a handy trick to be able to use for the several pages that do need a large page spread.


Preschool goals for using the bumble bee lacing page
While the previous abacus page was to practice tactile counting to ten, this page is to help the girls learn to recognize the numerals 1 to 10, and to place them in sequential order. Each flower also has a corresponding number of dots next to the numeral, so they can count dots if they don't remember the numeral. It's also good for practicing small motor skills, as little fingers thread the beaded bumble bee through the small rings. I was worried that the girls might have difficulty with this part, since the rings are just bigger than the bee and you have to push a little to get the felt wings to go through the hoop. Fortunately, they were able to manage just fine and enjoy threading the bee through the flowers very much.

Other letter B activities
Our Letter B week was kind of all over the place. We did some generic alphabet activities like drawing pictures of B things, especially the girls'10-year-old Uncle Benjamin, bouncing on a trampoline! We also read The Magic School Bus - Inside a Beehive, and ate honey sandwiches. But by far, the biggest hit of B week was watching Sesame Street's "Letter B." Laurel loves this song more than any other, and it was the first song that she would frequently sing to herself. Two months later, it's hard to remember this since she's always singing songs now, and doing the hand motions to go with them. But a couple months ago, shortly after she turned two, this song helped her overcome her self-consciousness and sing by herself out loud. It's still a favorite, and frequently requested by both girls.

Thursday, November 14, 2013

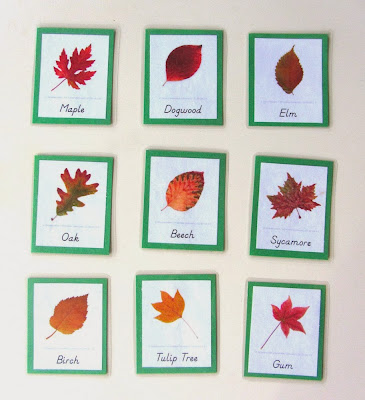
Autumn Leaf Identification Cards


A few weeks ago I came across some beautiful fall lead cards from one of the inspirational crafting blogs I follow called Imagine Our Life. The cards featured printed fall leaves in gorgeous colors, laminated and ready to play matching games.

Stephanie's Montessori Autumn Leaf 3-part Cards on Imagine Our Life

As soon as I saw them, I knew I wanted to do something similar. But when I showed them to my botanist husband, he objected that the leaves were not printed at real-life sizes. Plus, it would be a whole lot more fun if the girls and I collected and pressed real autumn leaves from our neighborhood. Collin borrowed a nice leaf press from the university herbarium for us to use, and we were all set.


Over a few days, we took several slow walks around our neighborhood, picking up the most beautiful leaves from as many different types that we could find. Immediately after bringing them home, we'd place them between layers of newspaper in the plant press, close it up, and tighten the belts closing the press as hard as we could. If you want to try this but don't have a large plant press like this one, any plant press or even newspapers in heavy books will do the trick.


One tip Collin gave us on drying the leaves more efficiently was to place the plant press sideways on top of the largest heat run. That way the warm air would blow through the corrugation of the cardboard. In this picture you can see the plant press sharing the heat run with Annie and Jenny.


After the leaves had dried at least 24 hours they were ready to be mounted. I glued them to white cardstock with basic white glue. The glue was in a bottle with an especially fine point, which helped accurately apply it. I squeezed fine lines of the glue along all the major veins of the leaves, including the stem, and then carefully pressed the leaves to the cardstock. The white cardstock was all cut to 5 x 8 inches, and the blue mounting cardstock were half-sheets, all 5.5 x 8.5 inches. This seemed to be a good size to fit most moderate-sized leaves, and multiple examples of small ones.

Collin insisted we label them with the scientific binomial names as well as the common ones. Those are also printed on cardstock, and just attached with glue stick glue.

After the glue dried overnight, I covered them with contact paper. I was in a hurry when I bought the contact paper, and I grabbed a roll of clear matte instead of glossy. I'm not sure if there were any rolls of super-clear contact paper, but I know I've used it in the past and it would have been better. The vinyl didn't seal around the leaves very well, and I was pretty disappointed with the initial results. Then I decided to try heating the contact paper with my hairdryer to see if I could get it to melt a little and seal more like lamination. It worked great!

If you look closely at the picture below, you'll see there are two cards of Sugar Maple leaves. I did this so I'd have a card to try each step (gluing, labeling, applying contact paper, and hair-dryer laminating) on a spare card in case I made any mistakes the first time through.


Here they all are! Twenty cards, with nineteen varieties of autumn leaves in all shapes and colors. Someday, hopefully in the not-too-distant future, I'll have a bulletin board in our school room and will be able to put these up for our fall nature study. In the mean time, the girls can use these to learn the different textures and colors of autumn leaves without the leaves cracking and disintegrating. The semi-warterproof coating means Jenny won't be able to eat them easily. And Collin has a fun game to play with the big girls in the evening. 

Collin: "Annie, can you say Acer?"
Annie: "A-ser!"
Collin: "Saccharum"
Annie: "Sak-KAR-rum!"
Collin: "Very good! Now, can you say 'Quercus muehlenbergii?"

Tuesday, November 12, 2013

Alphabet Quiet Book: A is for Abacus

This post is the second part in a series about the alphabet quiet book I'm making with the girls for preschool this year. To read the introduction, click here, and to read the rest of the posts (updated on a weekly basis) click the "Quiet Book" label on the right.


A is for Abacus
The first page of our alphabet book, A is for Abacus, is fairly simple compared to some of the later pages, but in many ways it's my ideal page for this quiet book. It sets the pattern for the rest of the pages, in that it has the letter appliqued with both capital and lowercase forms. Each page also has the activity's word embroidered on, both to make it very obvious what the word of the page is, and to let the girls see the letter used in context.


Inspiration and Page Design
There are a lot of quiet book abacus pages out there, and for good reason! One of the best things about this page is that it has moving, but not removable parts. In designing this quiet book I tried to find ways to have plenty of activities for each letter, but to minimize the number of pieces that can get lost. As you'll see in future weeks, sometimes I did well at meeting this goal and sometimes I spectacularly failed. 

I was especially inspired by this abacus quiet book page, and so I included Annie's 5-letter name in alphabet beads just like in the example. I used the wooden beads because I liked the look better than the plastic beads, but in hindsight the plastic beads would have been better since the wooden alphabet beads were bigger than the plastic pony beads.

One other abacus page I liked was this one on Etsy. I thought the way the beads are in sequential color order, with the "1" bead always being red, the "2" bead always being orange, etc. was clever and helpful. In the end I didn't go that way because I only had nine colors of pony beads, and I wanted to include Annie's name on the A page.


Preschool goals for using the abacus
Right now, we're using the abacus page simply to practice tactile counting to 10, and to have a visual picture of the size of each number. In the future I could see very simple addition or subtraction with our basic abacus. I thought about making our fabric abacus a little more like a real abacus, with ten rows of ten beads. That would be more useful long term, because we'd be able to do simple multiplication and division on it as well. But this really is our preschool quiet book, and my girls need to focus on basic counting this year. My goal by the end of the school year is for Annie to be able to easily count to 20, to recognize by sight the numerals 1-10, and for Laurel to be able to count to 10.

Other letter A activities
Singing songs is also a very large part of our preschool time together. After breakfast every day, and even before getting dressed in the morning, Annie and Laurel start singing our preschool songs. And often I'll hear Annie singing the same songs to herself up to an hour after lights out in bed at night! On our A week we spent a lot of time singing and listing to an A is for Apple alphabet phonics song on Youtube.


We also love watching Sesame Street Youtube video clips about the letter of the week. They have 26 video podcasts with approximately 6 minutes of sketches about each alphabet letter. Generally I'm a little skeptical about plopping kids in front of a screen and calling it educational, but I think the alphabet videos are great. Combining the catchy songs with visuals of what the letters look like and example words of how to use the letter is a brilliant combination, and I've already seen it helping Annie learn the letter sounds.

 The Sesame Street Sing the Alphabet album is a also mainstay of our preschool Grooveshark playlist. Here's "The Sound of the Letter A"

Big Bird / A-The Sound of the Letter "A" by Sesame Street on Grooveshark

If any of you have favorite alphabet, phonics, or letter A songs, either in audio or video versions, I'd love to hear about them! I'm always looking for new songs to sing with the girls so the same ones aren't always stuck in my head.

Tuesday, November 05, 2013

Alphabet Quiet Book: Introduction


I'm excited to finally start a series of posts on what the girls and I are doing for homeschool preschool this year! Annie turned four a few weeks into the school year, so this is our first of two years of preschool for her. Because of that, I wanted to ease into school nice and slow, having fun while we learn some fundamental preschool skills.

Last spring, my mom wrote a great post on her blog about doing preschool at home. She wrote about how preschool should be fun, and a good time to get young children excited about learning. 

"Keep it fun. Keep it short. Plan your activities in advance. And then be faithful. Your children will love the time spent learning with you. "

Not surprisingly, since she was my preschool teacher, this is also my approach to preschool. We sing a lot of songs, read a lot of books, and are working on learning the alphabet over the course of the entire school year.


This summer I decided our all-year preschool project would be to make an ABC quiet book. I planned on learning a letter a week, with a little flexibility for busy weeks. Each letter would have a page in our activity book, and each page would also teach a key preschool concept.


I read dozens of quiet book blogs, made extensive notes, and finally came up with a master plan of the ideas and inspirations we would use to make our alphabet book. I also consulted several "Things your preschooler needs to know" type lists to help create my list of activity pages. It was really fun to be working on this almost-too-fun-to-call-it-school lesson planning at the same time as Collin was creating his much more serious lesson plans for college biology courses.


Before I go any further, I feel like I should throw in a disclaimer. This project isn't quick, easy, or cheap. This quiet book is the main activity I'm doing with Annie (and Laurel) for preschool this year. It's making a beautiful, useful tool that we'll be able to use with all the girls, and hopefully more children in future years, but it's not an activity I'd recommend in addition to another curriculum. If you like to sew and have a decent stash of supplies/fabric scraps lying around, then it's a super fun project to work on while teaching the alphabet to your young children. But it takes a LOT of time, persistence, and materials.

That said, since several people have asked to see what we're doing for preschool, I thought I'd share what we're doing and you can use it in any way you'd like. If you want to turn some of the page activities into paper crafts, that's great! If you just like looking at inspirational pictures, that's great too. Most of all, I'm hoping to communicate some of the enjoyment and fun the girls and I are having together as begin our homeschooling journey.


OK, so on to a few details about the quiet book. Like I said, it's pretty time consuming. Even making the cover took the better part of a weekend. I totally love it though! The only sad part is that, having finished the first nine letters, it's already apparent that this will have to be a two-volume set. Maybe I'll call the second volume X Y Z. It sounds better than N O P, anyway.


The cover is made like a quilt, with batting sandwiched between two layers of calico fabric. Actually, I think the cream fabric on the front cover is some kind of synthetic. I picked it up at a charity thrift store, and while it's a perfect neutral for many elements of this quiet book, I'm not entirely sure what it is. But that's my first tip about making a quiet book - use what you have available, and get as much as possible from bargain bins at thrift stores. If you bought everything new to make a 26+ page quiet book it would probably cost a couple hundred dollars.


The inside of the cover is lined with a red and white dot fabric. The lining of the cover is pretty important, since it will always be a visible border around the pages. I didn't think about that very much when I chose this fabric, but now having seen it with a variety of fabrics on the inside pages, I'm very happy with it. It's fun and cheerful and goes with lots of the other fabrics I have in my scrap pile.

To further personalize this book cover, I sewed in a little piece of ribbon that I wove with my initials. I like that it's visible in the corner no matter what page is open in the book.


The decision to bind the pages together with large book rings was an easy one. This way Annie would be able to play with each of the pages as I finished each of them, rather than having to wait until I finished all the pages to sew together a complete book. Finding the 2" binder rings was a little difficult, however. We live in a small town without any big box office supply stores, and Walmart didn't have any rings larger than 1.5 inches. I could have ordered them online, but was having a hard time convincing myself to pay more than $5 for three book rings. With a " couldn't hurt to ask" attitude, I stopped in our downtown copy shop one day to check to see if they had large rings. Not only did they, but they were only $.38 apiece! Sometimes I love having a more limited shopping selection, since it helps me discover local shops that I wouldn't even think about otherwise.

I bought a gross of grommets from an online sewing supply store called Wawak. They have unbeatable prices for everything from the grommets to sewing thread to the interfacing I used to back each fabric page. One tip about the grommets - if you use this kind of grommets, you really want the little metal tool that fits around the grommet so you can pound it together with a hammer. I happened across this tool in a crafts bin at a thrift store, but you can buy them on Amazon, and probably at local craft stores too. I also have the Dritz grommet pliers, and while they work well with the lightweight eyelets and grommets you can buy at Jo-Ann's, they don't work well with the ones from Wawak. I like the grommets from Wawak better, since they give a smoother finish once they're sealed. They just take a bit more force to close.


So here we are, 11 weeks into the semester. As of right now, I've finished the cover of Volume One and all the letters through I. That means we're pretty much on track to finish M by Christmas, and all of the letters by next May. I'm planning on a family trip to the nearby Children's Zoo to celebrate after we finish the letter Z! In the mean time, you can look for regular updates with a new letter of the week. I'm looking forward to sharing a little of what the girls and I are doing this year with ya'll!