Showing posts with label garden. Show all posts

Friday, March 04, 2016

Garden Seed Organization System


If you've been gardening for a while, you might be able to relate to this problem. Every year in late winter, when it comes time to plan your summer garden, you pull out all your old seed packets, and try to make an inventory. And, if you're an enthusiastic sampler of many plant varieties, after a while that seed collection can get a bit out of control. Until recently, our seed collection was housed in a motley collection of cardboard shipping boxes and manila envelopes. Some of the seeds were rubber-banded together in loosely associated groups, but there was very little method to the madness.

Last spring, my husband asked if I could do something to bring some organization to the mayhem, but after looking around on the Internet a bit I didn't come up with any great ideas, and forgot about it before long. Fortunately, my husband has a short memory, and he did too. In the mean time, we added another manila envelope of seeds to the collection, and by the time we were ready to place our 2016 seed orders, things had only gotten messier. 

This spring, I was ready to tackle the problem. And I was ready to tackle it in time for my husband's birthday present. I should've taken a nice "before" picture for you so you could see how disorganized our lack of a system was, but by the time I'm ready to tackle a project I just want to get on with it already. Like I said, if you're a gardener reading this, you probably can imagine. Dozens of seed packets, no rhyme or reason.

Here's our pepper collection. Seeds in all different size envelopes and plastic bags... time to make them a folder!

I looked into what other gardeners have done, and found a few interesting options. Some slip seed packets into binders or photo albums, some use clear photo cases or re-purposed cassette tape boxes. There were even cute Pinterest-y ideas like saving seeds in Tic Tac boxes or test tubes that made for great photos but questionable practical ideas. Looking at all the ideas, this seed file box really stood out to me as the best fit for our needs.


I bought a blue photo box and 4x6" index card dividers from Amazon to get started. I made a list of the general seed categories I'd be sorting the seeds into, and printed the labels off in 24 point font. Next came the most fun part! I searched for images of vintage seed packets and seed catalogs to illustrate the seed varieties for each folder. So many of these images were so beautiful or off-beat hilarious that many times I wanted to show my husband what I was working on, but somehow managed to keep the secret until his birthday.

Each folder was made of two dividers, taped together on the inside with packing tape, with a 1/4" or 1/2" strip of cardstock in between, depending on the number of seed packets I estimated each folder to need to hold. The outside of each folder was covered with clear contact paper, for strength and protection.


The outside of the box was just as fun to decorate. My decoupage skills are sadly lacking, so I just glued the cardstock printed pages to the box, and hoped for the best. The top and bottom of the box are covers of a seed catalog from 1894 that I found on the Smithsonian library's website. Front cover on the top...
 

 And back cover underneath!


The sides were mostly illustrated with vintage Victory Garden posters. I loved these!


Putting an image of a vintage seed cabinet on a modern seed box felt kind of meta.


"Can Vegetables, Fruit, and the Kaiser too." I love it!


Those propaganda posters are doing their job. I feel energized and ready to take on the patriotic duty of gardening!


My 6 and 4-year-old girls illustrated the inside with gardening pictures. 


This is Daddy, digging in the garden.


And here is a desert garden on one side, and colorful grasses on the other.
 

Inside the lid I pasted three growing season charts that I've admired for a long time.


Amazingly, although this was a fully collaborative project with our 6, 4, and 3 year old daughters (the baby didn't contribute much), they kept it a secret until Daddy's birthday! And, I think he liked it. That night we finally filled it with seeds, and clipped each folder closed. Ahhh. Organization. It looks so much better.


So, that's our seed organization system! I'd love to hear about yours. Do you have a good way of keeping track of your garden seeds?

Saturday, December 05, 2015

Glass Gem Corn


Last winter, as I was in the depths of my seed-catalog survival reading, I was browsing my Pinterest feed when I saw this link to Sow & Dipity's post on Glass Gem Corn. I was transfixed. I'd seen Indian corn before, of course, but nothing like this. I desperately wanted to grow some, but the price from the original seller, Native Seeds, was pretty steep, with high demand and limited quantities. A bit more searching brought me to an E-bay seller who had good prices and good feedback, so I placed my order.


Between being very pregnant, a very wet (like, 200-year historic flood levels wet) spring, and a big garden construction project, I got my corn planted late. By the 4th of July, it had grown up to Annie's knees, but that was all you could say for it. I was worried it wouldn't have time to mature before fall came.


Three weeks later, things looked very different!


And after three more weeks, the corn plants towered above Annie, obscured the whole row of sunflowers planted behind it (oops, bad planning on my part there), and was starting to tassel.


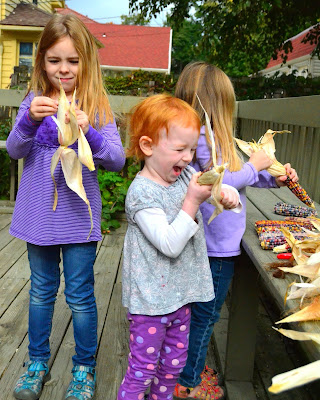
We let the corn mature and dry on the stalks until the first frost in mid-October. Then we picked the ears, and had a big shucking party on the back deck. Everyone who grows the corn says that opening each ear is like opening another present, and it's true! It's so exciting to peel back the dried corn husks and reveal the bright colors underneath.


I planted 30 seeds and harvested 40 ears of corn from them. And look at the colors! A whole rainbow from just a tiny patch of corn.


Forget a whole rainbow from the corn patch - each individual ear of corn had so much variety that it was stunning to look at. The depth of color, the many different hues, so intensely bright and translucent - looking at it, you just have to sit back and marvel at God's creativity and wonderful gifts to us.


I brought the ears of corn inside and let them dry in a single layer for a month, and then shelled it. Final yield: 5.5 pints of popcorn for eating, another pint of damaged corn for bird seed, and a nice fat envelope of the best seed for planting next year.

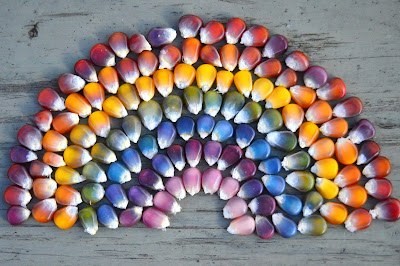
Then the girls and I sorted a couple pints of seed into little jars by color. Because it was too pretty not to enjoy a little longer, especially since winter is coming on fast and the bright colors of fall are long gone.


Aaaahh! A rainbow of Glass Gem corn seed! So much fun, even if I did freeze my fingers setting it up outside to get the natural sunlight


And, finally - a rainbow in a jar. This beauty is going to be the last jar we eat, so we can enjoy the full range of color all winter long.


When I took my harvest pictures, I shared them with the Glass Gem Corn page on Facebook. They generated a fairly large response, and the comments generally fell into four groups:
  1. "Beautiful!" "I want to grow some!" and "God is amazing!"
  2. "Those are GMO. GMOs are not cool." (Or, my favorite, which has since been deleted, "GMO! GMO! God will punish you!")
  3. "It's not even GMO, thank heavens!"
  4. "Sure, it looks cool, but is it edible?"
Well, it's easy to respond to these. Yes, it is beautiful, you should grow some, and God is amazing! No, it's not genetically modified, it's been selected and bred the old fashioned way. But either way, it was still a man using the tools God has given him to grow the best corn he could, so let's stop freaking out about how that colorful corn was developed. And, yes, it is edible! 


So, pretty colors aside, how does it taste? Well, let's throw some in the popcorn pot and see!


OK, full disclosure - it didn't actually pop that well. It had a really high ratio of halfway popped kernels to fully popped ones. I think that's probably because the corn isn't quite dry enough, but it's really hard to know when it's at the perfect dryness for popping. More bad news - the kernels lose most of their color when popping, so you have to loo closely to notice it isn't just regular yellow popcorn.

The good news is that it tastes amazing. I popped it alongside standard grocery store popcorn several times, and you could always taste the difference. The freshly popped grocery popcorn tastes stale next to the crisp nutty flavor of the Glass Gem popcorn. I could always tell the difference, even when I mixed the two popcorns together in the same bowl. And the half-popped kernels still taste good - and even the girls agree. They're a lot like soynuts, and very edible as a snack.


I'll leave you with one last shot of my rainbow in a jar. Until next year, Glass Gem corn!

Wednesday, September 09, 2015

Annie's Fairy Garden


Back at Christmas my sister-in-law made the girls a really cute play fairy garden, complete with flower fairy dolls. Think of it as a fairy-themed dollhouse. The girls played with it for months until the imitation moss was getting all over the room, so finally I had to take it apart and save the components for re-assembly later.


For Annie's birthday, Collin and I pulled out some of those accessories and planted a live fairy garden in an old enamelware bowl. We spent an evening date re-potting succulents at the university greenhouse, and brought a few divisions home as well as several new succulents from Walmart. Incidentally, Walmart has a really good selection of succulents these days, most for around $3. It's as good or better than many selections we've seen at plant nurseries. Thanks for making them trendy, Pinterest!


The miniature bridge, fairy light, glass river stones, and little toadstools all came from the first play fairy garden. The larger mushroom table is actually a champagne cork that I painted a while ago just for fun when I noticed its natural mushroom shape.


Several pieces from Annie's informal rock collection (doesn't every kid come home from walks with their pockets full of rocks?) made their way into the landscape, including this little stump that I think is a deer antler segment.


The blue glass marbles cascade as water down a creek bed banked by some of the larger landscaoe rocks, while pea gravel rounds out the look.


I fixed up an old $2 vanity chair from a thrift store for the plant stand. When I bought it I'd been thinking of reupholstering it, but I never found the right room for it, so when I needed a stool for the fairy garden it was the perfect solution. A few coats of paint on the seat, and it was a whole new chair. 

We set it up behind Annie's bed in the bow window of the girls' room, which is the sunniest spot in the house. Now we'll have to see if it can withstand three curious girls! I hope it can, because I need a good spot to over-winter some of my potted plants, and eventually I'd love to set up a plant-covered window seat in this space. An reading nook surrounded by plants sounds just about perfect.


A few of the extra succulent clippings went into this small fruit bowl for my kitchen windowsill, so I'll also have some green to enjoy all winter. Even when the view from that window is entirely white and brown, there will still be some living plants inside to help hold me over until spring planting season. It'll be fun to see which plants have outgrown their space by then, and which do well in the group planting.