Showing posts with label preschool. Show all posts

Tuesday, September 30, 2014

Alphabet Quiet Book: T is for Town

This post is the twenty-second in a series about the alphabet quiet book I'm making with the girls for preschool this year. To read the introduction, click here, and to read the rest of the posts click the "Quiet Book" label on the right.


T is for Town
This is my very favorite page in our quiet book so far. I have a lot of near-favorites, and pages I like very much, but I think this one comes out on top. After I show you all the details, I think you'll see why. The whole thing is entirely personalized to our home, our neighborhood, our town, and our favorite places to visit. It's so much fun!


Inspiration and Page Design
Many quiet books include some kind of car driving page, and even more frequently you'll find stand-alone car mats. One of my inspirations was BeepsPeeps' On-the-go Car Mat, especially for the fold-in pocket garage for storing the toy cars. I made my pocket into a parking lot that folds up and hooks into the main page for storage. It's bulky, but stores pretty well for all that. I also loved the City Quiet Book Page from Imagine Our Life, with all its lovely details and the button-backed vehicles.


One of my favorite parts of this page are the street and business signs made from Grafix Shrink Film. I had some of this left from other projects, including the C is for Clock page in our alphabet quiet book. I'd seen online that other crafters have had success in running this standard shrink film through an inkjet printer after prepping it with sandpaper, but when I gave it a go the result was runny and disastrous. Actually, the whole thing wiped off with a swipe of an alcohol-soaked paper towel. Since buying shrink plastic that's made specifically for inkjet printers was cost prohibitive, I came up with another solution. I printed off a reverse image of the signs that I wanted for the page, and then carefully colored them onto the back side of the shrink plastic with colored pencils. 

After cutting the signs out, punching the buttonholes with a standard hole punch, and baking in the oven according to instructions, all the imperfections from the hand-coloring evened out. As the last step, I painted the backs of nearly every sign with several coats of white fingernail polish. The signs that had no white (the school, railroad, church, and traffic lights), I protected with a light clear coat of nail polish.

Once I had all the signs finished and laid out on my desk, Annie examined them thoroughly. She has a good eye for signs and logos, so she quickly recognized Aldi and a number of others. Then she asked, "Which one is Walmart?" I told her, "We didn't make a Walmart. We're only making signs for our very favorite places." Annie exclaimed, "But Walmart IS my very favorite place!" I nearly made her a Walmart sign after that, but I just couldn't bring myself to do it.


In my opinion, the best car mat pages are personalized with landmarks familiar to the kids who will be using it. I love this example by Sweet Mama Duck, and how it includes specific places, as well as as super cute gas pump and car wash. 

I was thinking about a number of ways to represent our town on the page when I got a promotional e-mail from Spoonflower offering a quick giveaway of a 8" swatch of their (at the time) new fabric, Performance Knit fabric. If you're not familiar with Spoonflower, they are a company that allows independent artists to design and print their own fabric designs, and they have really high quality, if pricey, results. I quickly ran out with the girls and our camera, and took pictures of our house and around our neighborhood, and put them together into a square mosaic to print. We picked four of our favorite places on our street: our house, the church one block down, the public library, and "The Castle" which houses the city offices and police department.


Before I cut into the swatch, I backed the fabric with lightweight interfacing to help stop any fraying of the edges. Then I cut out the buildings, and laid out the signs and various pieces until I had an approximate layout for the design. One problem I encountered was that all the buildings I'd chosen were on the same street in real life, so I had to make a more creative road layout so the cars would have an interesting path to drive on. This kind of bothered Collin who has a real head for maps, and he said that if the girls tried to use the Town page as a map in real life they'd get hopelessly lost. Oh well.


When you have this many elements to a page, it's essential to think in layers. I stitched the river down first, since it goes under the road. The railroad zipper runs parallel to the river, but it crosses over the roads, so it would go on later. For the roads and parking lot pocket I used an old charcoal-colored t-shirt from Collin's closet, and yellow ribbon for the center lines. The buildings went on next, and the sign buttons and embroidery went on last.


When the page was entirely assembled I added some hooks and eyes to hold the parking lot pocket down. I wasn't going to do this at first, but the pocket flopped around terribly at first. After I sewed in the hooks and eyes the problem was completely fixed the problem, securing the pocket and making it more flush with the page.


To make the parking lot pocket I sewed a double-thick rectangle of fabric. I added more of the yellow ribbon for parking space stripes, and then folded it up and zigzagged along the edges to form the pocket.


To create the reserved parking spaces, I cut freezer paper stencils with an X-Acto knife and used regular acrylic paint on the fabric. I used the recycling symbol for the trash/recycling truck, the star for the sheriff/police car, and the mother's with small children symbol for the family car. I love it any time stores have a space for mothers with small children. Even when I don't make use of such a space, it seems like such a considerate gesture.


The cars themselves came from rummaging through a couple bins of toy cars at Goodwill. This was a very fun part of the project for the girls and me, and only ended up costing 75 cents! We really enjoyed picking through all the vehicles - outlandish ones, beat-up ones, bright sports cars - to find three that would work for our car page. I really like the ones we settled on, even if we drive a green station wagon in real life. The red shows up better on the green background anyway.


Here's a close-up of our home, with our street sign and even the trash can sitting out by the street waiting for pick-up. You can see how well the Spoonflower fabric shows the image - the detail and color are wonderful.

Last year was huge year of transition for our family - new house, new job, new town, new church - and Laurel who turned two shortly after moving here had a rough time. She developed new fears that took a while to overcome, and cried in her bed almost every night when we said goodnight. For months. So when Laurel looked at this finished quiet book page, pointed at our house and said softly, "I like our home," I just melted. Sewing the whole page was worth it, just for that moment.


Preschool goals for using the Town page
My main goal for this page was to get the girls to learn what different street signs mean, and to be more observant as we walk around downtown. We talked about, and paid attention to stop lights and crosswalks during our walks. We learned the different shapes of different signs, and what they mean. Annie got very good at this game, and would call out "library!" any time she saw the blue book-reading symbol around town.


So there you have it. T is for Town - in this case, a very personalized town, with all the places we're growing to love, in a place that is becoming more and more home to us. And that is a very sweet thing.

Tuesday, September 23, 2014

Alphabet Quiet Book: S is for Shoes

This post is the twenty-first in a series about the alphabet quiet book I'm making with the girls for preschool this year. To read the introduction, click here, and to read the rest of the posts click the "Quiet Book" label on the right.


S is for Shoes
Every quiet book has a shoe-tying page in it. I believe it's pretty much a basic requirement of quiet books, and as such there are myriads of creative versions out there. I already sewed a running shoe page in Laurel's Buckle Book, so I thought about some of the alternatives. I considered doing an Old Woman Who Lived in a Shoe page like this one (a rhyme which the girls and I frequently recite together to restore sanity whenever things get too crazy around here.) After looking through several of my saved ideas, however, I realized that ballet Slippers, ice Skates, and Sneakers are all varieties of shoes that start with S, so why not do a page with all of them together?


Inspiration and Page Design
Each of the shoes on this page were inspired by a different source. These sneakers came directly from the pattern on Made by Me & Shared with You. I had to make it a very specific size so I could fit it onto my page of three shoes, so after trying to scale and print the pattern a few times, I gave up. I ended up simply adjusting the zoom on my computer until I got it exactly where I wanted it, and then traced directly from my computer screen onto freezer paper to make the pattern.


The sneaker was nice to sew in that all the pieces were already in a pattern so someone else had done the work of thinking through each part of the design. I ran into trouble when trying to install the eyelets for the laces, however. Because I shrunk the design down a bit, the eyelets had a very narrow strip for support. I discovered, after several failed attempts, that including a third layer of felt under the shoe top (one that you don't see at all) is crucial to the success of setting stable eyelets in craft felt.


The idea for the skate came from the Winter Wonder Quiet Book pattern for sale on Etsy. I preferred a more realistic look, however, so I ended up sketching my own design based on my own ice skates. All the pieces are cut from leather, cut carefully to match my sketch exactly so they'd fit together just right. There are four pieces - the main boot, the tongue, the sole, and the blade. The tongue and boot, as well as the toe of the sneaker, were originally a piece of dark brown leather that I spray painted glossy white after installing the eyelets and hooks. Similarly, I spray-painted the blade silver after cutting it out of a thicker piece of leather.

I had a funny picture here of the first failed attempt to paint the boot, but I can't find it on my computer now. I'd painted the leather pieces white and left them up on the kitchen island to dry. Before they had dried I discovered Laurel standing on top of the counter, tell-tale white paint on her pink socks, and fuzzy smears all over my leather pieces. Fortunately, some paint thinner cleaned it up enough for a fresh coat of paint, and I put it away in an even higher location where it was able to dry undisturbed.


I sewed the tongue down to the page first, an then attached the boot over it. As you can see in this picture, I didn't leave enough margin on the left, and had a lot of difficulty getting my needle around the eyelets and hooks. I think I broke a needle on the effort as well. So if you do this, make the margin a little wider than you need for your hooks!

The lace on the ice skate is a four-strand round braid, with three doubled strands of white embroidery floss, and one of silver. I would have liked a real ice skate lace, but I didn't have one handy at the time. I might replace it if I run across one, but this one works well for now.


My inspiration for the ballet slippers was from this post on All the Quiet Things. I decided not to include feet since the page was just about shoes, but to have them lace up as if they had feet in them. It's hard to tell from these photos, but the slippers are sewn from a silky pink fabric that I had in my stash. I layered that with some pink felt underneath to give it some substance, as the silky fabric on its own didn't look very shoe-like at all.


Preschool Goals for using the Shoes page
When I wrote about Laurel's Buckle Book last year, I mentioned that I'd intentionally avoided buying my girls any shoes with actual laces, since tying and untying shoes is a chore I'd rather eliminate if possible. Since then I did break down and buy Laurel a pair of real-lace shoes that she's totally in love with. As such, teaching her and Annie to tie shoes is more imperative, and on our list of preschool life skills that we're trying to learn this year. Hopefully between the three shoes on this page and the one in Laurel's quiet book, they'll master the skill before long!

Next week I'll be posting what is probably my favorite quiet book page to date, and with only three left to sew before we finish, Letter T might very well remain my favorite of the whole project. I can't wait to show you all!

Wednesday, September 10, 2014

Annie's felt play laptop


Hello again! I took the summer off blogging since spending time in front of the computer seemed like a poor option when the weather was so beautiful and the daylight hours so long. We had a full summer, brimming with travels to see family all over the place, rest from Collin's exhausting first year teaching, and a filled with a profusion of projects. We put in a garden and fixed up all the landscaping beds around the house. We gave the kitchen a complete face lift, with new paint for the walls, cabinets, and new shelves for the walls. We finally unpacked our bedroom and bought a bed frame so it looks like we actually live here and aren't just camping out. And we knocked an abundance of small projects from my list, which made me very happy and ready to start another busy semester. Many of these projects I'd like to write about on this blog as I have time,
but now we're back to the school semester and I'd like to finish up our preschool post series.

Before we get back to the quiet book, however, I wanted to show you a little related project I made for Annie's birthday this week.


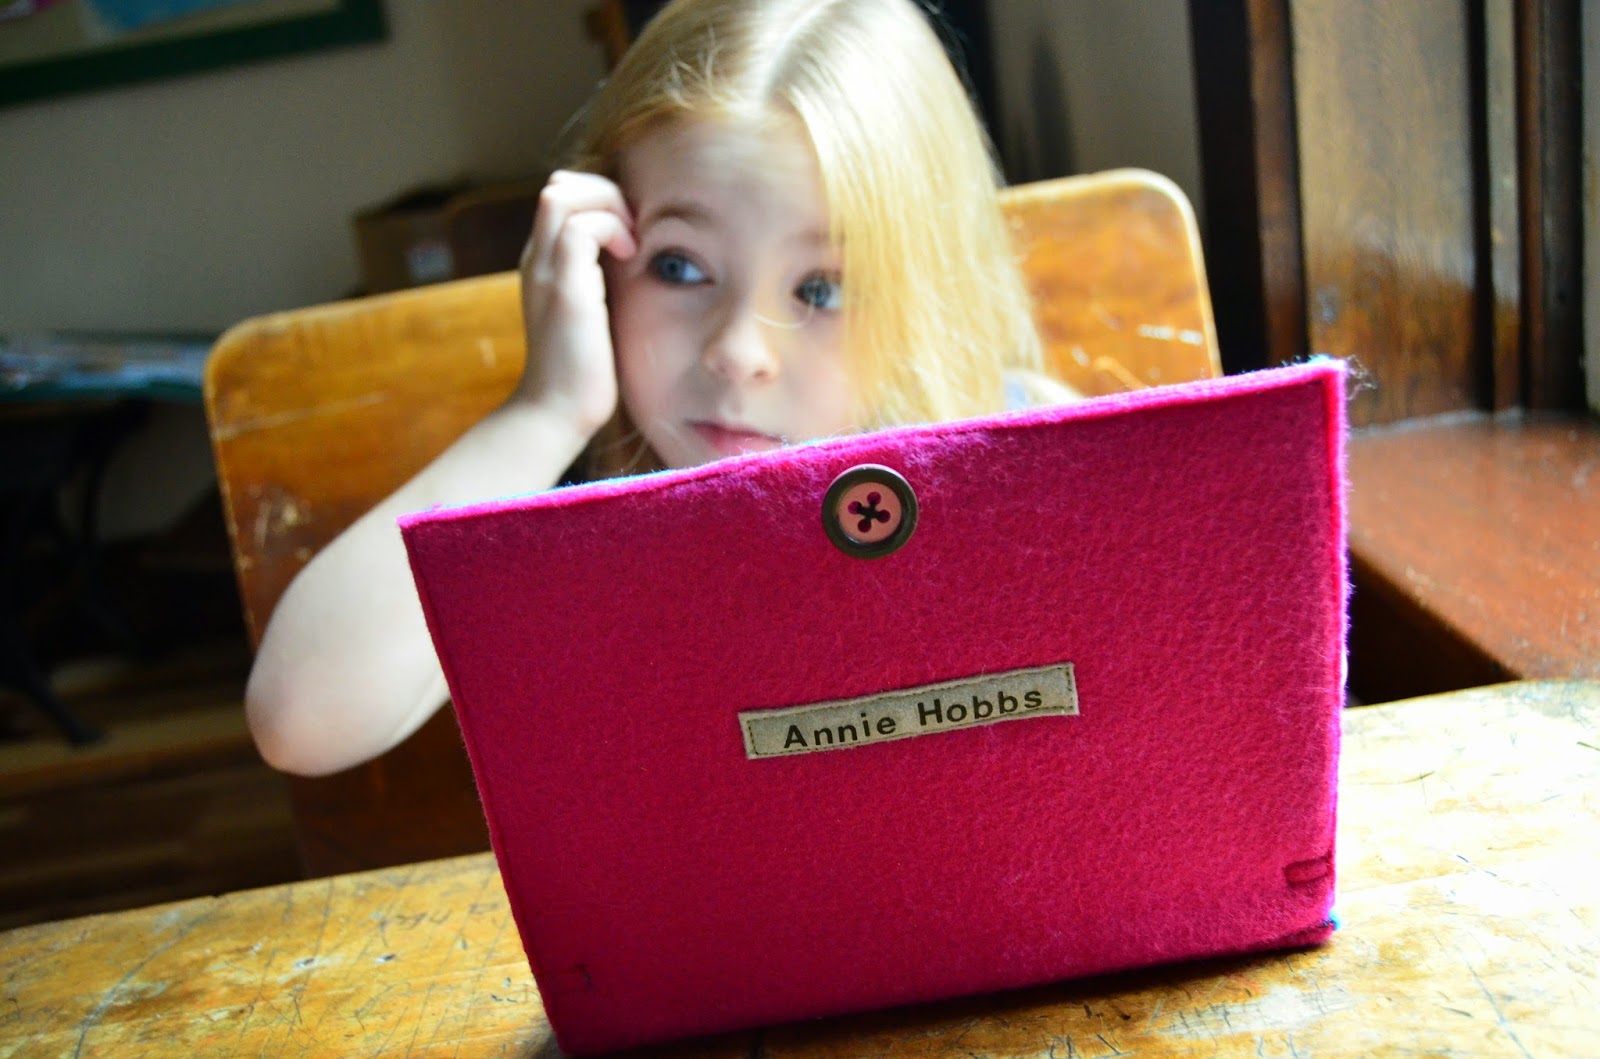
A number of months ago I ran across this felt laptop tutorial on Kiki Creates. Annie was looking over my shoulder, and was completely taken with it. "Will you make me one of those for my birthday?" she asked then, and many times in the following weeks. When Annie gets an idea, she doesn't let it go. I told her I couldn't make any promises, but I'd see what I could do.


The first thing I had to find were the rub-on letters the tutorial suggested for the computer keys. I loved the professional polish they gave the final product, but since we don't have any craft stores in town it took a bit of tracking down to locate. Finally I found them in a Hobby Lobby when we were on one of our summer trips, in the fine arts section near the stencils. We picked the 1/4" letters in Helvetica as the best font for the job.

Transferring the letters to the felt keys was more difficult than I'd hoped, but in the end I got it done. The keys are 1/2" squares of basic white craft felt strengthened by a bit of interfacing. I "basted" the letters onto the keys with the tip of a paintbrush, and then rubbed and rubbed and rubbed with the slightly rounded back end of a cheap ballpoint pin. When the letters were completely transferred, I removed the plastic film they'd previously been stuck to very carefully, checking to make sure I didn't tear the letters as I did so.


After I had all my keys made, I sprayed them with clear enamel. This in turn created a whole new set of problems, as with the first blast of air from the enamel I sent tiny felt pieces flying all over my back deck and into my flower beds! Then the clear coat completely dissolved the styrofoam plates I'd been using to hold the keys as I sprayed them. After retrieving all the keys and making some new ones to replace the lost or ruined ones, I sprayed them in small batches, using a piece of parchment paper as backing. This worked beautifully, and the letters all peeled up perfectly after drying.

With the clear coat, the rub-on letters are protected from being scratched off, and the computer keys are stiffened so that they feel more like a real keyboard. Even if just for protecting the letters, I wouldn't skip this step, despite any possible frustration.


With all my letters ready and dry, I cut my gray rectangles for the keyboard and screen (5x7") and laid out the keys until I came to an arrangement that I was satisfied with. Then I glued the keys to the keyboard with tacky glue, going line by line and using a ruler to try and keep the keys as straight as I could. Once I had all the keys, touch pad and buttons glued in place, I covered it with a piece of parchment paper and pressed it under a couple heavy books to dry overnight.

The next day I stitched all the keys in place. A glue gun probably would have held the keys in place as the original tutorial suggests, but I wanted the added security as well as the neatness of actually sewing all the keys down. It took a long time and my foot got a cramp in it from all the times of pressing, releasing, and pivoting every five stitches! I sure celebrated when I finished and sewed the keyboard and screen down to the blue inner felt.


Between the top layer of fuschia felt and blue lining felt is a sheet of fuschia-colored extra thick stiff felt. When I went to Jo-Ann's to buy felt for this project they only had three colors of stiff felt in stock - white, black, and fuschia - so it made my color decision easier. I cut the stiff felt to the same width as the top and bottom layers, but each piece a quarter inch shy of half the length so that when put together they left a 1/2" gap in the center of the laptop for folding. In other words, for my laptop that is 8" by 6" when folded, I cut the stiff felt into two pieces each 8" by 5.75".


At this point, I also sewed the nameplate to the laptop "lid", the button to both layers of fuschia felt, and the button strap just to the bottom edge of the inner stiff felt. I was trying to minimize seams that would show on either outer layer to keep the look clean.


When everything was ready, I stacked the layers all together and stitched around all the sides with a 1/8" seam allowance to hold it all together. Then I stitched a straight line down the center for the fold. I sewed on the side supports that keep the lid up, just like in the original tutorial, trimmed up a few loose threads, and I was finished!


 Annie's laptop is quite a lot smaller and cuter than mine. I purposely left the screen blank so that she could imagine what she's doing with it, whether writing a story, looking at pictures, or playing a game. It also works as a very small flannelgraph, so we might do something with that in the future.


I'm interested to see how exactly Annie is going to use this in play. Yesterday I saw her staring at the blank screen and looking very absorbed, and she told me she was watching a funny video on it. I didn't ask if there were any cats in the video. Sometimes kids are a scary mirror.


 On the other hand, this is more how I was hoping the computer might inspire her. I think in this picture Annie is trying to compose The Great American Novel, but got a case of writer's block.


Problem solved! On with the story!

Tuesday, May 06, 2014

Alphabet Quiet Book: R is for Rainbow

This post is the twentieth in a series about the alphabet quiet book I'm making with the girls for preschool this year. To read the introduction, click here, and to read the rest of the posts (updated on a weekly basis) click the "Quiet Book" label on the right.


R is for Rainbow 
I might have packed a few too many things into this single quiet book page! Early on, I knew that I'd be making R for Rainbow, and that we'd also be learning some basic color theory along with it. When it came to actually designing the page, at first I had too few ideas, and then after I got working on sketches the ideas just kept coming.

Wouldn't it be fun, I thought, to make the rainbow flowing down onto an artist's palette? And the paint blobs could button on and off the page! And wouldn't it be cool to have bead raindrops coming down from the rainbow's cloud so you could see how the rainbow was created? When it comes to that, wouldn't it be even more amazing to make those raindrops little prisms so that when you shine a light through them, you can make an actual light rainbow? Well, yes, all that would be neat. And somehow it all came together to make this one page!


Inspiration and Page Design
There are a number of rainbow quiet book pages I found that I really liked, especially this one by Tanya with color matching buttons. I also liked the paint palette pages, including the one from Gray's felt book on Life Lesson Plans. Because I wanted my page to be about learning the names and order of the colors of the rainbow, I decided to combine these two ideas into something new.

As part of the basic color theory we're learning, I embroidered the acronym "Roy G. Biv" on each corresponding color of the rainbow. Roy G. Biv, in case you haven't heard it before, stands for "Red, orange, yellow, green, blue, indigo and violet."


Since we were going all out with rainbows on this page, I even appliqued the R and r on with some multi-colored thread I had leftover from another project.


Conveniently, the word Rainbow has as many letters as it has colors! I embroidered the word with red, orange, yellow, green, blue, indigo and violet. I probably made the letters a little too big, since they ran into the edge of the page, but the effect is still extremely cheerful and rainbowy.


For the artist's palette, first I appliqued the felt palette on, and sewed the felt paint blobs. After I laid them all out, I saw where the rainbow stripes would need to go, so then I cut out the rainbow and sewed it on, left to right. Last of all I sewed on the buttons and buttoned on the paints. My colorful button supply was lacking, so I ordered these inexpensive buttons from Ebay. A note of caution - about 15 of the buttons arrived smashed in the mail, and the international shipping was extremely slow. The crystal raindrops also came in a small packet from China, but they arrived weeks before the buttons. But they were still worth the $3 I spent, and the color assortment was lovely.


I made the paint spots by fusing two small pieces of felt together with Wonder Under in between. Then I cut organic shapes, free-handing them with scissors. I sewed the edges and button holes all by hand with embroidery floss, since I didn't want to fuss with such tiny pieces on my sewing machine.


The button holes and paint circles are fairly small for my 2-year-old Laurel's fingers, but my 4-year-old Annie enjoys buttoning and unbuttoning the paints from the page.


I got the idea to make the raindrops from little prisms from watching the morning sunshine make rainbows all over the room through the crystal beads on our dining room chandelier. These raindrops are teardrop crystals that I also ordered from Ebay. I strung them onto crochet thread, tied knots between each bead, and then sewed the ends of the thread into the page. After they were all attached, I sewed on the felt clouds.


Although I knew the girls could probably find a flashlight to shine through the raindrops on their own, I wanted to include one with the page so it would be self-contained. After looking through the dollar store, the smallest light I found was a LED/laser pointer combo. The size was perfect, and the laser pointer made beautiful kaleidoscope patterns as the crystals broke up its beam. As I thought about it overnight, however, I decided I really didn't want my kids to blind each other with the laser pointer, so I reluctantly nixed that idea. Fortunately that very day a friend gave the girls some freebie LED key chain lights without laser pointers as part of a grad school promotion, so our problem was solved!


It's hard to photograph the rainbows we can make with the little light and crystal raindrops, but it definitely works, especially in a dark room.


Preschool goals with the Rainbow page
  • Learn the names and order of the colors of the rainbow. 
  • Learn the acronym "Roy G. Biv". 
  • Learn about mixing primary colors to create secondary colors. 
  • Practice buttoning and unbuttoning. 
  • Learn about how rainbows are made by white light shining through water or prisms.

Wednesday, April 30, 2014

Alphabet Quiet Book: Q is for Quilt

This post is the nineteenth in a series about the alphabet quiet book I'm making with the girls for preschool this year. To read the introduction, click here, and to read the rest of the posts (updated on a weekly basis) click the "Quiet Book" label on the right.


Q is for Quilt 
I have a lot of favorites among our quiet book pages, but this is definitely one of the top. When I first outlined the alphabet quiet book and our preschool goals for the year, I knew Q would be for quilt, and that we would be learning how to make a bed that week. But when it came to designing the quiet book page, I didn't find any examples that really taught about how to make a bed, so I ended up designing my own. I love the result!


Inspiration and Page Design
I originally started thinking about doing a quilt for the Q page when I saw the cute alphabet quiet book Dacia made on Fluffy Bunny Feet Designs. She used the quilt as a pocket for hiding treats or notes, which is a great idea, but didn't really fit in with my goal of learning how to make a bed. After I finished my quilt page, I also ran across the idea of making an I-Spy quilt using squares with pictures from novelty fabrics. My favorite one of these is on Empty Bobbin Sewing Studios, which features some really beautiful fabrics. But like I said, I ran across that idea after I finished my Q page, and my main goal was designing a bed-making page anyway.


I considered making a mini quilt with a fancy pattern and triangles and everything, but in the end I decided on a simple square patchwork design like this one from Mama Loves Quilts.

To make a 6" square patchwork quilt of 1/2" squares I had to cut 100 1" squares. Look at how much that shrinks once you sew 1/4" seams around them all! Once I'd pieced the center squares all together, I added a 1/2" border around. Then I sewed the backing and quilt top wrong sides together, flipping it right side out and ironing open just like I do with all of the quiet book pages, ending with machine quilting. I skipped using any batting, since it was bulky enough with all those seams inside.


Under the quilt I have a brown fleece blanket. This is just a square of polar fleece that I hemmed up, adding some pretty stitches with my machine to give it a finished look. After I had all the bed linens assembled and in place, I folded the bottom edge of the blanket around the sheets and mattress, and stitched carefully through all the layers to hold them in place. Thus, the sheets and blanket are attached to the mattress at the bottom edge, but not to the page itself. The quilt I hand-stitched to the bottom edge of the blanket so that it wouldn't have to fold much, to cut down on bulk and avoid hiding any of the square quilt under the bed.


The green flat sheet is much the same as the blanket, except I made it a bit longer so it could peek out from under the quilt and tuck neatly under the sisters' chins.


The sister finger puppets all rest on top of the fitted sheet which was sewn, appropriately enough, from an old white sheet I've been cutting into for a long time.


The little pillow cases, made in green to match the flat sheet, are all hand stitched to the fitted sheet, so they won't fall off the page. The tiny white pillows, each stuffed with a cotton ball, are removable but fit snugly in the pillowcases.


This is a close-up look at how the fitted sheet fits all around the mattress, which is attached to the page in the middle.


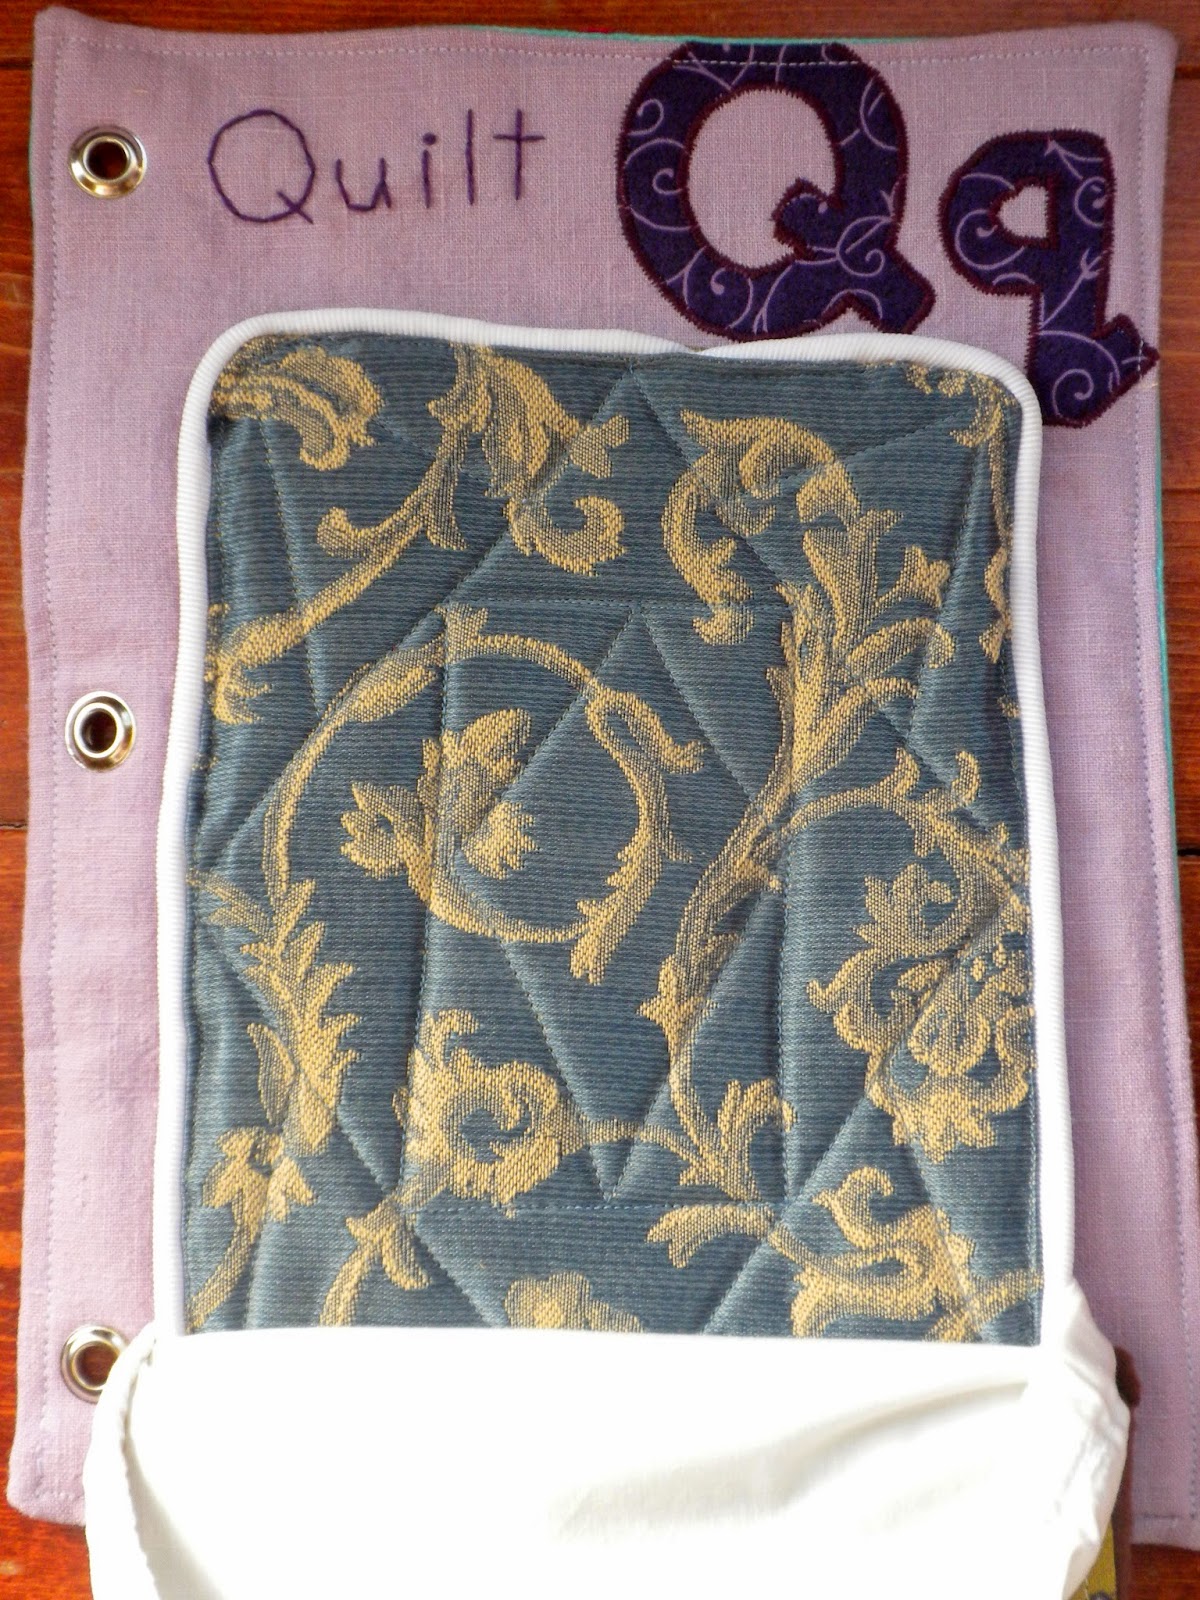
After making it through all those layers, we finally reached the mattress. I know it's kind of silly, but this is the part I'm proudest of on this page. It looks so much like a real mattress! I had some upholstery fabric for a couch I'm re-covering for our living room that is perfect mattress fabric, so I used a square of that for my mattress. I made some piping with a white shoelace and grosgrain ribbon, and sewed that in as if it were a flat pillow. Between the two layers of upholstery fabric I sewed a rectangle of a felted wool sweater for heavy batting. It gave the mattress the perfect amount of substance. Finally, I machine-quilted the whole thing so it had the texture and stability of a mattress.


Another thing I had to reconcile was the need to have the mattress to stay in place on the page, but also allow the edges to be free so the fitted sheet could be tucked in around. Now that I've done it, the answer seems obvious - sew the center of the mattress to the page - but it took me a long time thinking about it to reach that answer! I stitched right over the inner rectangle of quilting lines, and it works perfectly.

Annie, Jenny, and Laurel, Matryoshka style

My mom made these adorable wool felt finger puppets for the girls' stockings this Christmas, and I knew right away that they'd find a home in our alphabet quiet book. I think they're made from this pattern on The Prudent Homemaker. They really are the icing on the cake of the quilt page - without them, the quilt page would be a little dry and flavorless! Annie and Laurel have the brown hair, and redheaded Jenny has the goldish orange hair. I tried to tuck the in bed in age order, but Annie and Laurel were adamant that Jenny needs to go in the middle. I'm not sure if that's because they really like their little sister or if they're just OCD about symmetry.

Now that we've looked at all the layers, let's make the bed and tuck the sisters in!


Preschool goals for using the Quilt page
My goals for this page are to teach the girls about the necessary components of a properly made bed (fitted sheet, flat sheet, blanket (give or take depending on the weather), quilt, pillows, and pillowcases. I wanted them to learn the order they go on, and to start to get the hang of tucking and smoothing them out over the bed. In real life, I'm also trying to teach them to make their own beds. It's a work in progress, but they do seem to be getting the idea, and they are already experts at making the bed on the Q is for Quilt page.